You Will Need:
Jeans
Seam ripper
Scissors
A length of scrap fabric (optional)
Thread
Sewing Machine
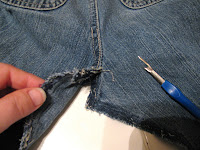
1. Begin by ripping out the crotch of the jeans. You don't have to go all the way to the hem; just go a little beyond the desired length of the finished skirt.
2. Fold the jeans in half and cut off the legs at the desired length. (In this case, just above the rip at the knee.)
3. Look over the fabric from the legs you cut off. Note any worn areas you don't want to use, or areas you particularly want to use for the skirt. For example, these jeans had a cute embroidered hem detail that I wanted to reuse.
Open up the jeans and lay a piece of leg fabric beneath the back V-shape of the in-progress skirt.
4. Pin the fabric in place, retaining the natural edge fold in the jeans. If needed to make the skirt lay flat enough, rip a little further up the jean inseam and fold under some fabric to make the V-shaped godet lie flat.
5. Repeat steps 3 and 4 for the front of the skirt. Trim both V-shaped godets so the hem edge is in line with the rest of the skirt-in-progress.
6. Topstich the godets in place.
7. You may now either hem the skirt by making a narrow hem, or you may lengthen the skirt by adding a ruffle, as I did. To add a ruffle, cut a rectangular piece of scrap fabric about 1 1/2 times the measurement of the hem of the skirt. (If you want a fuller ruffle, use fabric 2 or 2 1/2 times the length.) You may either sew a narrow hem on one side of the ruffle, or you may fold the ruffle material in half, as I did. Sew basting stitches along the top of the ruffle, pull up the bobbin threads, and pin the ruffle to the skirt, right sides together. (See this tutorial for more details on how to gather fabric.) Stitch in place.
Easy peasy!


No comments